WELCOME TO THE WORLD OF EYELASHES

DIY: Dyeing Eyelashes the Right Way Step by Step – The Best Tips *
|
|
Time to read 4 min
My Cart
Your Cart Is Empty
Continue shopping|
|
Time to read 4 min
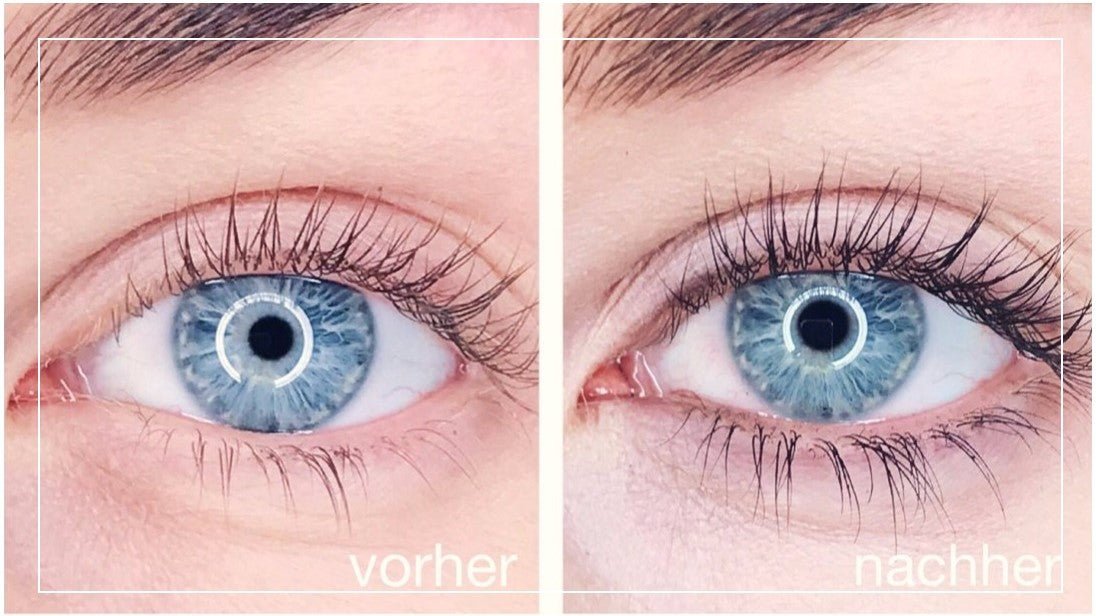
How nice would it be to wake up every morning with long, dark, sweeping eyelashes with mascara! You can improve on nature with the right eyelash dye. To achieve this you don’t necessarily need a beautician; we will show you how it is easily done at home.
Eyelash dyes are available in brown and black color. Your selection depends on your type: generally black is the preferred eyelash color, especially, if you are dark-haired with dark eyebrows. But if you are light-haired aiming for an ultra-natural look, then you had better go with brown for your eyebrows; it looks better, particularly on older women.
Once you have selected a shade for yourself, you will need a special eyelash or eyebrow colouring kit. Avoid going for a cheap product since, after all, this is about your eyes! And never use a normal hair dye. That is too harsh for your eyes and could set off terrible allergic reactions.
Watch out for a few things in eyelash dyes: just like hair dyes, many eyelash dyes too contain ingredients that can cause allergies. It is thus imperative to exercise caution when using dyes. In general, always see to it that the chemical does not run into your eyes. Most often that causes a burning sensation and redness.
In terms of price and quality we have thus opted for the new Made in Germany, Swiss-o-Par eyebrow and eyelash colour, consisting largely of natural ingredients and consequently free from allergens. The reducing agent that actually causes coloration is, in this case, replaced by a mild and natural component, i.e. Vitamin C.
What works in favour of this product is also that the solution for dyeing is freshly prepared each time, by using one Vitamin C tablet. This increases the life of the pack by weeks and months and it does not spoil like other dyeing sets.
We tested 12 different eyelash kits and 4 of these products made the cut, the Swiss-o-Par eyelash dye emerging the winner and our favourite among the tested products.
#1
Delia Color Cream for Eyebrows 10.72 £
Keep tissues or cotton pads, some cream rich in oils and a couple of cotton buds ready, a small bowl of water too is helpful.
It will take about 10 to 30 minutes for dyeing depending on your level of practice.
Most standard eyelash dyes include protective paper pads in the pack, meant to mask theskin beneath the lower eyelash rim. They stick very well if you dab a little oil-rich cream with a cotton bud (or lip balm) on the skin beneath the eye before affixing the pad.
Ensure that the cream does not touch the eyelashes, as this will later prevent proper coloration of the eyelashes. You can turn this, though, into an advantage by dabbing some cream on the upper eyelid to stop undesired residual dye remaining on the skin. Incidentally, the Swiss-o-Par eyelash dye does not colour the skin!
Stylists prefer to use professional eye pads for masking on account of their superior adhesive quality and nourishing properties. The other trick is to stick fine micropore tape strips on the upper and lower eyelids instead of paper pads.
Find out what works best for you.
Now you need a steady hand: dip a fresh cotton bud into the developer and brush it on the upper and lower eyelashes. Take your time and apply it carefully to cover each and every strand. If you rather keep one eye shut, you can complete working on one eye before you move on to the next. This minimizes the risk of the solution running into your eyes.
It’s time for the dye now. Take another cotton bud to apply the dye gel on the eyelashes. A small eyelash comb is often provided in the pack, on which you can put a fine layer of the gel and run it through the eyelashes like mascara until it is evenly applied everywhere. The viscous gel often does not adhere immediately to the eyelashes, but with a little patience and persistence, it works.
Application is much easier if you keep a couple of micro brushes at hand that help cover even the finest, tiniest hair.
Now you must leave the dye on as instructed, most often, for no longer than for 3-5 minutes. Thereafter rinse out the dye with warm water, ideally using moistened cotton pads. Keep brushing the pads over your eyelashes, until there are no dye-remnants left on the pads. Caution: keep your eyes closed while doing so, to stop chemicals from entering the eyes.
If you do not feel confident about doing all this by yourself, you can have your eyelashes dyed by a professional. Most beauticians would charge around 10 EUR.
Dyeing does not mean foregoing mascara application completely, but it will certainly not require working as much at it.
No mascara means, no clumpy eyelashes sticking together and freedom from the tedious chore of removing make up. That certainly makes it worthwhile to occasionally dye your eyelashes. The colour mostly lasts for about 4-6 weeks with most products.
If you also want the perfect sweep for your eyelashes then do use these eyelash curlers with built-in comb or a heated eyelash curler.
Pamper yourself with an eyelash lift for a lasting eyelash perm. Eyelash dyeing can be done simultaneously with eyelash lifting. You will require a good eyelash lifting set for the eyelash lift.
We wish you all the best and great success for your eyelash dyeing session 😊 – You will learn about colouring eyebrows the right way in my next tutorial.


